Focal points are one of the storytelling composition tools I bring up in my new book Learning to See Better Vacation Photos.
What is a focal point?
It’s a prime spot in the photo where you want the viewer’s eye to stop within the photo. You can have a single focal point, or several focal points – but one of them should be the primary one.

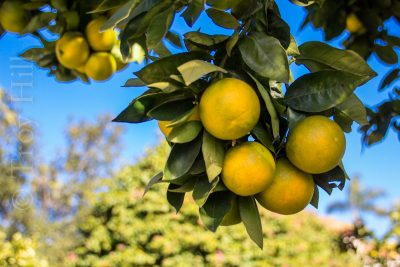
In this image, the cluster of fruit in the foreground is the primary focal point. The idea of positioning my focus point on the fruit closest to the camera, and letting the rest of the photo drop out of focus is a technique we call selective focus. I cover the basics of this in the book, and will probably write a more in depth how to section in the upcoming sequel to Learning to See Better Vacation Photos. For the purpose of this article, just notice how having only the front cluster of fruit in focus helps tell the viewer that the fruit is the primary focal point of the photo.
Too many focal points?

A photo can have competing strong focal points, or lots of subtle focal points. Whenever I find an image doesn’t quite work the way I imagined, I can usually track the issue back to a lack of a strong focal point. Take a look at the banner photo at the top of this page, the one with the rocks above the reflecting pool. I like the photo, but there are too many competing focal points. The next time I’m back at the location, I want to work to find a dominant focal point, isolate it, and make a better image.
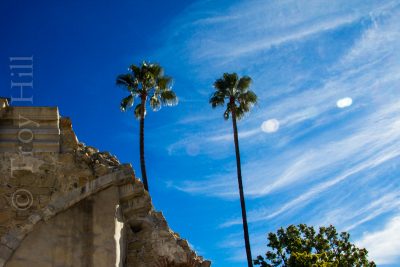
The image above of the palm trees has three different elements that serve as focal points: The palm trees, the walls of the ruins, and the tree in the lower right.
If we use the leading lines of the ruined wall, the tree in the lower right might seem to be our main focal point, but there really isn’t enough of that tree to justify it as a focal point. So, now we’re left with the trees or the wall. Again, there doesn’t seem to be enough of the wall in the image to serve as a focal point. That leaves the two palm trees.
Everything in this photo is far enough away, I can’t do my trick of dropping my focus point on one item, and using a shallow depth of field (like in the photo of the fruit) to isolate the primary focal point. Instead, I need to use the composition to showcase the focal points.
Could the photo be improved by cropping, or recomposing when I was at the scene? Let’s see. Here’s the same photo, cropped with a photo editor:

Notice that I’ve removed the distracting tree in the lower right. Plus, the tighter crop has removed some of the lens flare spots, that made the clouds look like an abstract face. The new crop has put the heads of the palm trees closer to the rule of thirds lines, with the tree on the right almost exactly on one of the crosspoints. The ruined wall at the left now serves as a bit of a frame instead of as a real focal point.
My composition was OK at the scene, but I made it better with just a simple crop in the photo editor.
Get it Right in Camera, or Tweak it Later?
Sometimes, when we photograph a scene, we forget about deciding which focal point is primary, or we can’t get close enough to make exactly the image we want. With the tree’s above, I found that I could improve the image by cropping. Getting the image correct in the camera is a great idea, and one to strive for.
But, part of the learning to see process includes looking at your photos after you take them, and making the tweaks like I just did. I routinely adjust crops, straighten images, and make lots of other little adjustments when I get the photos uploaded to my computer. I have found that taking the time to make those adjustments when I first upload the images saves me time later on.
I suggest you treat the process as a two step issue. Strive to see your photo when you aim your camera and press the button. Look at the scene, try to visualize the photo you’re taking. Then, when you upload the images to your computer (even on a phone, you can upload the photos to a computer, and use the photo/media editor that comes with the computer), learn to see what you did, and start to think:
How can I make this better the next time I take a photo like this?
That’s all that Learning to See really is. Look, learn, and remember for next time. Try something different, look, learn, and remember for next time. Once you start looking and learning, you’ll find you make your photos better.
Oh, and the learning never stops. Every time we raise our cameras and push the button, it’s a different scene. Only you know the story you want to tell.